Yearbook curriculum
Looking for inspiration, design tricks, how to make a great cover, promoting your yearbook and engaging your community?
Most recent

Yearbook staff application template: sign-up volunteers now!
A yearbook staff application might seem like an overly formal, entirely unnecessary step when recruiting students to help with the yearbook on a volunteer or after-school club. It’s not.
Sure, an after-school yearbook club creates a low-stakes environment for students to unleash their creative energy and to learn some awesome new skills, but it can also create problems: One, you could end up with more students than any sane adult could ever hope to manage; two, without a grade hanging over their heads, students could lose the motivation to finish their work. In some cases, you might end up dealing with both.
That’s why you need to use a yearbook staff application.
A yearbook staff application is essential to putting together a dedicated, enthusiastic team of student volunteers, and it lets you achieve four key things related to your yearbook recruitment and planning before you even have your first meeting:
- You identify the yearbook club roles you need, and how many people you need to fill them.
- You limit the size of the staff you need to complete the book.
- You attract students who are actually interested in doing the work needed for the yearbook.
- You find out what your students are good at and interested in before getting started.
Read the rest of this post, and you’ll know exactly when you should use a yearbook staff application and what to look for in student volunteers. The payoff? A yearbook staff that’s exactly the right size and that will stick around until it’s time to hand out the yearbooks.
When to use a yearbook staff application
In a perfect world, yearbook club would be an open door, where anyone who wants to participate could just walk in, take a seat at a computer and start plugging away at whatever needs to be done. But we know that can’t always be the case.
Here, then, are the times you’ll probably find yourself needing to use an application process as you recruit your students:
- Demand outweighs supply. As in you have too many students interested in the yearbook. We’ve seen this happen at schools where the yearbook is a big part of school culture. So many students are geeked up about the yearbook that it seems like nearly everyone at the school is itching to help make it. But if you have everyone help and there’s not enough work to really go around, you can end up with disgruntled group. Not fun.
- Eager starts end with empty seats. As in you have the right amount of students at the beginning of the year, but they drop off, one by one, until you’re left with a few dedicated (and soon to be overworked) students. If you’ve ever experienced this situation, you know how stressful it can be.
- Everything feels like a disorganized mess. As in you know what you need to get done—and you’ve got the students to help you—but you don’t know who’s going to do what or how anything’s going to get done. It’ll sort itself out, like it always does, but for a few days, maybe even weeks, it’s a nerve-wrecking beginning to yearbook club.
In these situations, a yearbook staff application can sort of serve as a bouncer at your open door.
You’re not necessarily using the application to weed through students and pick your dream team; you’re using it to find out who’s really into the yearbook and who isn’t. By giving students a little extra work up front, you’ll more easily find those students who are ready to do the work and you’ll more easily know which parts of the yearbook they want to help with.
Sure, it’ll reduce the number of student volunteers, but it’ll also increase the likelihood of you having a highly motivated team.
The 3 things to look for in yearbook staff applications
Just because the yearbook staff application is serving as a “bouncer,” it doesn’t mean you should review them. There’s lots of good stuff in there, and it can help you better understand your students and their motivations for joining the club.
So, you should read them. And, when you do, look for these things:
1. Did they complete the application?
This is fairly basic, but check over the whole application to make sure it was actually completed.
If a student scoffs at the idea of applying to work on the yearbook, or they crumple and toss the application into a backpack abyss, what are the chances that they’d be a committed contributor?
Sure, you could have an incredible photographer in the building who shuns formalities like “applications” and “attendance” in the name of art. By and large, though, an application is a great way to gauge future commitment and get to know your staff.
2. How do they fit the puzzle?
You need a diverse yearbook committee. Roles you need to fill include (but are by no means limited to):
- Photographers
- Designers
- Sales & Marketing Pros (those kids tweeting in the hallway between classes are about to become your best friends)
- Editor(s), for written work and images
- Interviewers/journalists in training
- Jacks & Jills of all trades
These students are going to be the lifeblood of yearbook, and getting to know their strengths and weaknesses at the beginning of the year can save you major stress down the road.
On your application, make sure you create a space for students to designate any skills or interests they might have. It’s also helpful to ask students which skills they’d like to develop.
Not only does this help you get to know your staff: it give you an idea of the roles underclassmen could fill the following year, too.
3. Is yearbook a priority?
Students are spread pretty thin. With stuff like school work, sports, Pokemon Go, and part-time jobs and at-home chores, it can be hard to commit to another activity.
Your yearbook staff application should ask students to be honest with the amount of time they can give. Just because a kid is busy doesn’t mean he or she can’t contribute in a unique and useful way. By using the information provided on the application you can set realistic expectations on an individual basis, ensuring a well-rounded, happy staff.
Set the tone when distributing applications
When students come to you for applications (you know, that time in the day when you tell them just how fun yearbook club is), be sure not to sugarcoat the experience.
You should absolutely highlight the fact that working on the yearbook is rewarding and allows for the application and development of skills (photography, editing, design, interviewing, and so many more), but this shouldn’t be an outright sales pitch. Be open and honest. Your goal should be to build enthusiasm amongst your prospective staff members while also making it clear that creating a yearbook takes work.
If you think that attending every club meeting is important, make that clear; if you want students attending as many school events as possible, tell them upfront; if you’re willing to be flexible on attendance, but expect work gets done at home instead, let them know that, too.
Setting expectations, in terms of attendance or general contributions, is a great way to establish which students are going to take things seriously and who’s on the fence before you even hand them an application.

5 yearbook volunteers to recruit
The first step in creating the perfect yearbook is recruiting your ideal yearbook volunteers. In a perfect world, each group member will bring a unique set of strengths to the table while working cohesively with one another. We’ve identified five personality types to consider as you begin assembling your “dream team,” along with best practices for guiding them along the path to print-ready.
1. Mom-a-razzi
There may be a parent or two on campus with professional photography experience, and that’s super. It’s no longer a requirement with many smartphones. For the scale of your yearbook project, you may need a class or grade parent (think an old-school journalism beat).
These parents are taking photos already, so you’re not challenging them beyond a simple, “Please take photos of other people’s children.”
Remember, you can easily build a yearbook if you have the content.
2. The Gatekeeper
If your team is not comprised of students and fellow staff members, you need an on-campus stakeholder on the VIP list. This person will be able to get you the inside scoop on school happenings, including the best way to sneak into classrooms for academics photos or how to set up shared photo folders with the faculty.
3. The Social Maven
Part yearbook hypeman, part yearbook marketer, this person will be in the know: stories, events, and students. She will take care of your sales campaigns and make sure everyone knows how, when, and where to buy the yearbook.
4. The Type-A Virgo
Do you want your yearbook to have a cohesive look? Do you want pages proofed and copy-edited? The Type A Virgo is your go-to for organization and project management.
5. The Cruise Director
While this yearbook volunteer isn’t the captain of the proverbial ship, his role as designated fun officer is clutch. He’s collaborating with the Social Maven on your next marketing campaign and coordinating a yearbook distribution party with school staff. (More than likely, this person is also in charge of several other committees to build community and school spirit.)
Managing Yearbook Volunteers
Now that you’ve identified your dream team, here are a few tips for managing the workload.
1. Create and Communicate the Plan
Build a project plan to determine your deadlines, tasks, and roles. We love beginning with a yearbook ladder to identify coverage and determine the yearbook page count.
2. Follow Up, Follow Up, Follow Up
Monthly check-ins, volunteer work nights, and ongoing communication help ensure the job you started will be completed. We’ve heard from volunteers that they feel their work is valuable with regular communication and seeing their contributions in action. Because their time (and yours) is valuable, make sure communications
- Are timely: give yearbook volunteers what they need when they need it. Only the Type A Virgo needs her March responsibilities on September 14 (and we love her for it).
- Have a set goal: predetermine the action(s) the team should take as a result of your communication. Do you need responses for the potluck or help tagging photos?
- Demonstrate appreciation: while I’ll never grow weary of hearing I’m awesome, meaningful feedback resonates much more. In your communications, try to highlight contributions often (e.g., “Because of all the Fun Run photos Tameka and Evelyn uploaded, Javier is now designing the layout! Thanks, team!”) and show how they benefit the yearbook.
3. Celebrate Often and Address Problems Early
When pages are locked, celebrate! When portraits are uploaded, celebrate! These festivities can be as simple as meeting for coffee after drop off or a dessert night in someone’s home.
Conversely, if things aren’t working out, be like Vanilla Ice and solve it.

How to write a yearbook story people will love to read
A good yearbook staff needs to know how to write a yearbook story, but that can be easier said than done. After all, writing something that people enjoy reading takes a lot of practice—even more than yearbook design and photography. And by the time you're done working with your students on all the other aspects of creating a yearbook, well, there's not a whole bunch of time left to spend practicing how to write a yearbook story.
That's why we wrote this post.
In it, you'll learn five easy-to-follow tips you and your yearbook staff can start using to improve all the copy in your yearbook, especially the copy that makes up your yearbook stories. We have pointers on improving headlines, writing ledes, finding your voice, and laying out your yearbook stories.
Before we get to those tips, though, we want to spend a minute on the big reason knowing how to write a yearbook story is important. And that's this: If you overlook your yearbook copy in favor of bold designs and strong photos, your yearbook is incomplete. That's because your written yearbook stories put memories in context. They tie your narrative together. They make readers want to spend more time on your pages. They make readers revisit your yearbook over time.
Let's get on with those tips, then, shall we?
5 tips for how to write a yearbook story
1. Power up your headline
A strong headline can make or break your yearbook story. Headlines draw readers in with a promise or a bold claim. They hold attention and create anticipation. The best yearbook story headlines are:
- Short – they quickly summarize the content to come
- Specific – they tell readers exactly what to expect
- Standalone – they make a statement on their own
- Special – they are unique, powerful and interesting
Headlines have the power to transform a mediocre story into something truly spectacular.
For example, instead of using a straightforward headline such as:
"The Blue Hawks’ Memorable Season,"
add excitement with a headline that pops:
"The Blue Hawks Swoop In For an End-of-Season Win!"
The second option ups the emotion while giving readers a reason to find out more about how the Blue Hawks overcame challenges during the season. You can even try to switch up the format of your story by using a “list headline”, such as:
"5 Times the Blue Hawks Surprised Fans This Season"
Or:
"10 Reasons We Love Cheering for Our Blue Hawks"
Your yearbook story’s headline not only sets reader expectations, but also sets the tone for your following narrative. Which leads us to…
2. Take a strong lede
Lede is a journalism term for the opening section of a news story. (Need a primer on yearbook terms? Check out this blog post and interactive quiz to keep fresh.) Reporters start their articles with the most critical information, enticing readers to continue and ensuring readers grasp the story’s main message. Think about this when you write your yearbook story’s introduction. The beginning of your story should:
- Deliver on the promise made in your headline
- Give readers the critical information they need
- Introduce action, conflict or emotion
- Prompt readers to continue to learn more
Need an example? Go back to the lede of this blog post. In it, we tell you exactly why yearbook story content is critical, and how this article will help you write better stories. (If you’re reading this right now, our lede worked!)
3. Be an active writer
To write active and entertaining yearbook stories, you need to use active and entertaining language. And this means writing in the active voice. For those who need a refresher, active voice is when the subject of a sentence is doing the action, while passive voice is when the subject of a sentence is being acted upon. An example of passive voice:
"The team was cheered on by hundreds of fans."
This sentence falls flat, because the fans are acting upon the subject (the team). It’s easy to switch to active voice, however:
"Hundreds of fans cheered on the team."
In this new sentence, the subject of the sentence (hundreds of fans) performs the action.
Another way to keep your writing active is to use strong verbs. Verbs are words used to describe an action – and they can be strong or weak. “To be” verbs such as “am, is, are, was, were” often weaken a sentence. Here’s an example of a weak verb at play:
"The debate team is responsible for researching their topics."
Here’s the same sentence, using a strong verb:
"The debate team investigates their topics."
Strong verbs convey more meaning than weak verbs, and help bring a yearbook story to life.
4. Give it some voice
Quotes and testimonials from students, parents, faculty and staff are great ways to bring both personality and personal meaning to your yearbook stories. Whenever possible, include statements from the individuals who were directly involved in the stories you’re recapping.
- Interview the swimming star on her big win.
- Ask a science student about his favorite experiment.
- Talk to a teacher about how her students changed over the year.
These individual moments will give your yearbook stories more context and emotion.
5. Design your yearbook copy
While you may think of copy and design as two separate entities, design plays an important role in your copy's readability. The right fonts, layout and sentence structure all work together to move a reader easily and comfortably through a yearbook story. Here are some ways to better design your content:
- Keep sentences and paragraphs short.
- Cut out unnecessary words.
- Add subheads to divide stories into sections.
- Break up text with call-out quotations or facts.
- Use bullet points to list short moments or stories.
- Keep fonts simple – select one font style for headlines and one for body copy.
Finally, in both content and general page design, be aware of white space. Don’t fill every blank spot with text or imagery; let your story breathe. Take time to write focused, meaningful and engaging yearbook stories. You'll end up with a stronger picture of your school year.
When it comes to creating a yearbook, knowing how to write a yearbook story is important stuff. Even if great writing takes a lot of practice, there are some easy-to-follow tips that will get you closer by the day. Follow them, and your yearbook is sure to succeed.

Teaching yearbook: 24 yearbook terms
Stuff. Thingamajig. Whatchamacallit.
If your day job isn’t in desktop publishing or graphic design (or teaching it), you and your yearbook team probably use those words to get across what you’re trying to say. You know what it is you’re trying to say, but you just … can’t … find … the yearbook terms you need to do it in a way that makes sense to everyone.
So, you use filler that causes more confusion than clarity.
We’ve talked to a bunch of yearbook advisers, and a lack of proper yearbook vocabulary is a common problem. Especially when new people join the team. We figured, then, that it would be good to pull together a list of yearbook terms everyone needs to know (and a whole bunch more that just about everyone should know).
Study up, and you could be skipping this type of painful conversation in nearly no time at all:
“We need to get that thing on page 8 done, so we can get those pages proofed?”
“What stuff?”
“You know… the… the… It’s right next to the whatchamacallit.”
“I’m not really sure what you’re talking about… You mean the thingamajig that I was working on?”
(Ouch.)
And, besides avoiding a conversation as bad and confusing as this, who doesn’t like learning new… uhh… stuff?
A list of yearbook terms everyone needs to know
- Bleed. The bleed is extra space around your page that is intentionally printed, then trimmed by the printer. The standard bleed size is 1/8 inch, and is usually used to allow for movement the paper during printing.
- Byline. A byline is a line that gives credit to the author of a story. It can appear either at the beginning or end of copy.
- Candids. Candids are photos that are captured without posing your subjects or distracting them from what they’re doing. They’re great for capturing everyday aspects of school life.
- Caption. A caption is a page element that explains the who, what, when, where, and why of a photo. Captions can also be used in the yearbook to tell readers something they would not otherwise know when looking at a photograph.
- Copy. Copy is the content of an article or news element. (Basically, it’s the words used to tell a story.)
- Copy Editing. Copy editing is work done to improve the format, style, and accuracy of a story. Though copy editing can involve correcting grammar and spelling, the primary reason to copy edit a story is to improve its clarity and ensure it aligns with a yearbook’s style.
- Dominant Element. A dominant element is the element on a page that immediately attracts a reader’s attention.
- Drop Cap. Drop cap is a design treatment used to introduce copy. It is distinguishable by a large letter (usually capital) that appears at the beginning of a text block and has the depth of two or more lines of regular text.
- Folio. Folio is page numbering that appears on the outside portion of pages, usually at the bottom. A folio may also contain the title of your yearbook or your section title.
- Gutter. No, it’s not attached to your roof. And, no, you don’t have to keep your mind out of it. When it comes to yearbooks, a gutter is the space between two facing pages (an important place to keep clear, because, when a yearbook is bound, the space between the pages shrinks). It’s best to apply a 1/2 inch margin to both sides of the gutter, or 1 inch in total.
- Headline. A headline is a line (or lines) of large type used to introduce the most important fact to the reader.
- Kerning. Kerning is the space between two letters that are next to one another. You can adjust the kerning to avoid gaps in your text (for example: if character pairs are spaced too far apart).
- Ladder. A ladder is a chart that represents the pages in a yearbook. It can be helpful when planning section placement and page content.
- Layout. A layout is a design plan for a page or spread in a yearbook. It accounts for the size and position of all elements on a page.
- Lead (or Lede). The lead is the introductory portion of a news story; usually the first sentence or paragraph. It relays to the reader the most essential information. In traditional journalism, it is spelled “lede.”
- Leading. Leading is the space between lines of text. You can adjust the leading of a text block to increase its readability or to squeeze more text onto a page. (Rule of thumb: The more space there is between lines of text, the easier that text is to read.)
- Modules. A module, also called a “mod,” is, essentially, the yearbook equivalent of a sidebar. It is a smaller amount of text with accompanying photos that supports a page’s main story.
- Portraits. Portraits are posed photographs of individuals. These photos are the photos that are usually being referred to when someone is talking about their “yearbook photo” or “school portrait.”
- Proof. A proof is a copy of the yearbook’s final pages that are sent to the staff for a final review and approval.
- Proofreading. Proofreading is used to catch any typos before sending a yearbook to print. It’s the last read of the yearbook and should be done on a printed proof.
- Pull Quote. A pull quote is a phrase or quote pulled from a story and used as a graphic element. It highlights a key topic or point in a story and is usually placed in larger, more distinctive type.
- Spread. A spread refers to two pages that face each other in a yearbook.
- Theme. A yearbook theme is an idea or concept that’s used to tie together the various sections and stories found throughout the yearbook.
- Template. A template is a predesigned layout that helps maintain visual consistency throughout a book. Different sections may have different templates.
Some more yearbook vocabulary for overachievers
- CMYK. CMYK is a color model traditionally used in printing. Printers use subtractive color, or CMYK, where cyan, magenta, yellow, and black inks are applied to paper. The color of the inks is altered by subtracting (or absorbing) light wavelengths.
- DPI. The abbreviation for dots per inch, DPI is a measurement of an image’s resolution. The higher the DPI of an image, the clearer and more detailed that image will print.
- Golden Ratio. The Golden Ratio is a mathematical rule that’s used to repeatedly create visually pleasing designs. In yearbooks, you can use it to create different layouts, and it’s best to visualize the Golden Ratio as a rectangle with its length (side B) being roughly one and a half (1.618) times its width (side A).
- Monospaced Fonts. Monospaced fonts are fonts that have equal width for each letter. They can be serifed or sans serifed.
- Orphans. Orphans aren’t just in Annie or Charles Dickens’ books. In yearbook publishing, they’re also a word, part of a word, or a small line of text that falls at the end of a paragraph on a line by itself. These “hangers” (if you will) create unwanted white space and are distracting to readers.
- Pica. A pica is a unit of measurement, often used to determine the width of an element on a yearbook page. It is equal to ⅙ inch (or 12 points).
- Resolution. Resolution is the sharpness of an image. In print, resolution is measured in DPI. In digital, it is measured in pixels.
- RGB. RGB is a color model traditionally used in digital publishing. Colors are created in the RGB color model by adding red, green, and blue pixels to a black base.
- Rule of Thirds. The “rule of thirds” is a guideline in photography that encourages a photographer to move the primary subject of the photograph away from the center.
- Sans Serif Fonts. Sans serif fonts lack the decorative elements found on serif fonts. They’re great for digital projects, since they are easy to read on computer screens, but are also very popular for printed headlines.
- Serif Fonts. Serif fonts have small decorative elements (called serifs) at the end of letter strokes. These fonts are more legible at smaller sizes and are great to use in large bodies of text, like the body copy in your yearbook.
- Style Guide. A style guide is a set of standards used to create consistency in your yearbook. Also known as a style sheet, it can be used for typographic, graphic design, and copywriting.
- White Space. White space, also known as negative space, is the empty area around an object. White space can be used to draw the viewer into a particular spot in the design. It prevents content from overcrowding the page.
- Widows. A widow is a word or line of text that sits alone at the start of a column or page. They’re similar to orphans in that they are distracting to readers.
Got ‘em?
Though it might seem like a waste to study these terms, we promise it’ll prove helpful in the long run. Just imagine how much more sense it will make to talk about finishing your “mod” (instead of “thingamajig”) or how you need to find someone to do “copy editing” (instead of “editing all this stuff”).

Advice for dealing with complaints
When a parent, staff member, or student approaches with a complaint about the yearbook, it can be challenging not to react or take it personally. Common yearbook complaints range from missed order deadlines to incomplete coverage (e.g., “I’m not in the yearbook enough”), and typos. Taking the right approach will help you validate the concern and move to a proactive solution for your yearbook program.
Listen to the complaint
“Take a deep breath, remain calm, and remember it's not personal,” Abby Oxendine, Treering’s Community Advocate Team (CAT) Director, said. “The person is angry with the product, policy, or process, not you.”
Give the person making the complaint your full attention and listen carefully to what they have to say. Allow them to express their concerns without interruption and empathize with their situation.
“The reality of their concern is real to them,” Yearbook Hero Chris Frost said. “It is important to understand that while your world includes every student, to the parent their kid is their world.”
Ask for specific details
Ask the person to provide specific details about what they're unhappy with in the yearbook. This will help you to better understand the issue and to determine the best course of action. Oxendine suggests summarizing their main points in a confident, positive tone to show you are listening. This also ensures you know exactly what the complaint entails.
Sample starter sentences include
- "I understand your concerns…"
- "Thank you for sharing your concerns with me…"
- "We will do all we can to fix these issues..." (Only use if you can fix the issue, e.g., ship a yearbook home to someone who missed the original deadline.)
Offer a solution
Frost said, “Sometimes just being able to express the frustration is resolution enough. They may not want your solutions, just to voice their concerns.”
In the case a solution is warranted—and feasible—commit to what is possible. If you set a follow-up action, make sure you call or email back by the scheduled time. It’s important at this stage you never overpromise.
Document the complaint
Recording the complaint and the steps you took to address it will help you to track patterns and improve future yearbooks for future editions.
Follow up
Send a follow-up email detailing the resolution. You might even consider offering the student or parent a position to help the yearbook team to help avoid issues in the future. This will show that you care about their opinion and are committed to improving the yearbook.
Personal anecdote: I had a teacher complain once about the portrait section who became the official portrait proofer for the yearbook.
Avoiding the top 3 yearbook complaints
When your hard work is on display and is a lasting keepsake, you want it to be the best reflection of your school community and your yearbook team. Here are ways to avoid the big three.
1. Missed order deadlines
We know: you sent emails, used a school-wide robocall, posted on social media, made a viral video with your principal, and someone still didn't know when, where, or how to order the yearbook.
How Treering can help
"Volunteering to create my kids’ yearbook is a lot of work, but with Treering I never worry about the outcome. I know Treering will help me anytime a problem arises."
Erin M., Treering Yearbook Specialist and elementary school yearbook coordinator
- The integrated marketing suite in each Treering account allows editors to send purchase and customization reminder emails, order free flyers, download social graphics, and share purchase links.
- Never tell a parent or student no again: your storefront is always open, and they can purchase an old yearbook, even years later.
- Mix up your marketing campaigns with our social calendar.
2. Incomplete coverage
Some parents and students may feel that the yearbook did not adequately cover certain students, events, or activities. To ensure that all events and activities are adequately covered in the yearbook, you can create a detailed coverage plan when drafting your ladder at the beginning of the year and assign staff members to cover each event.
Consider adding a note to acknowledge those who did take advantage of the opportunities to submit content and photos. (This is also a subtle reminder parents and students had opportunities throughout the year to be more involved in coverage.) A simple “Thank you parents and students who shared their photos and completed our surveys. We love telling your stories.” will go far.
How Treering can help
- Shared folders provide your stakeholders with opportunities to share their photos. Yearbook Hero Lauren Casteen uses these photos that the yearbook staff may have missed, such as a band event hours away.
- Community portraits allow parents the opportunity to upload a portrait of a student who may have missed picture day or joined in the second semester.
- Tag your photos and monitor coverage with the index report, a real-time listing of who is in the book.
- Parents and students can tell the story of their year with custom pages, two free pages that appear only in their copy of the yearbook.
2. Missing or incorrect information
One of the most common complaints is when a student's name, photo, or information is missing or incorrect in the yearbook.
When applicable, remind parents that this is a student-published item, while you do your best to facilitate the book, students have creative control and lead how the book is done. It’s their homework that is on display for a lifetime.
If it’s a volunteer job to create this living, breathing historical document of life for hundreds of kids at a moment in time. That is a heavy burden to carry alone. (Most professional journalists work in a team!)
“Parent volunteers have enough on their plates with being good parents, spouses, employees of their jobs, and volunteers to boot! Having to field phone calls from confused parents shouldn’t be another feather in their cap—unless they want it.”
Katie P., Customer Success Manager and elementary school yearbook coordinator
Yearbook disclaimer
Even the New York Times has a disclaimer. The yearbook colophon is a great place to add yours, whether you are a volunteer army putting together the book or a group of student journalists. It can be as simple as "We have done our best to ensure the accuracy of the information in the yearbook and apologize for any errors."
Tips for next year
To proactively combat errors, you can check your records and the student's school records to ensure all the information is correct. Another resource is the ever-changing school calendar.
Treering’s Customer Success Team recommends having a second set of eyes proof your book. If that’s not possible (we know a lot of yearbook heroes who do it solo), walk away for a few days then come back fresh. It's hard to see these little mistakes when you have been staring at the book for days.
How Treering can help
Remember, the key to handling complaints about the yearbook is to remain calm, professional, and focused on finding a solution that works for everyone. By addressing complaints positively and constructively, you can improve the yearbook and build trust with your yearbook stakeholders. Remember, in the end, you cannot please 100% of people 100% of the time.

Five yearbook activities not to miss
“Just putting pictures on pages” and other misleading statements about yearbook production do not capture what happens in the newsroom. However, it’s easy to take a heads-down approach to design as the deadline approaches. We all just want to finish! Nevertheless, amidst the rush, there are essential skills that you shouldn’t overlook. You’re going to want to save these activities.
1. Teaching yearbook
Because no teacher program provided the comprehensive graphic design, marketing, journalism, editing and proofreading, photojournalism, contract negotiation, and volunteer management training that makes a great yearbook adviser. Breathe! (Club leaders, you too need to facilitate students’ creative and collaborative development.)
We created the Teaching Yearbook series so you would have grab-and-go resources to enhance your yearbook classroom.
2. Speaking the language
Understanding yearbook and design terms means the team can have a conversation about the effectiveness of a dominant bleeding into the gutter without raising (too many) eyebrows.
3. Creating a plan to cover everyone
Creating a plan to cover everyone involves more than just taking photos. It requires thoughtful consideration of how to represent the entire student body in your yearbook, even if you don’t offer custom pages.
Every student is more important than every activity.
4. Teambuilding activities
Yes, games are important. Those forced fun activities help you break down the proverbial walls. (That’s the introvert talking.) More important: building a team of the right people.
Time spent investing in the right people and building healthy relationships will only benefit your book.
5. Managing yearbook complaints
Ouch. No one wants to field criticism of the yearbook when it is in print for all to see. No one volunteers to field emails with “friendly suggestions” for next year. From active listening to clear and transparent communication, having a plan in place for managing complaints ensures that any issues are addressed promptly and professionally.
This is one of those “better to have it and not need it” kind of things.

The 5 game-changing blog posts you’ve (somehow) been missing
You might be missing these favorite yearbook ideas. If any part of your yearbook process feels stuck, scattered, or stale, one of these posts is probably the solution you didn’t know you needed. Read them. Share them. Build them into your curriculum or club routine and watch your yearbook program transform.
1. Easy +1: a guide to leveling up your yearbook
This comprehensive guide outlines five key ways to elevate your yearbook beyond collage pages. It provides practical steps to add something new to next year’s book: a focus on storytelling, expanded coverage, better photography, or modular design.
Use the five focus areas to create
- Rotating workshop stations early in the year to build foundational skills.
- A self-assessment rubric for your team.
- A “Level Up” day where each leader identifies one area to improve in their section.

2. How to choose a yearbook theme
This piece walks you through the theme process without relying on chaotic verbal brainstorms. (Some yearbook creators even find its anti-brainstorming angle a little divisive. And we liked it.) It provides teaching support to non-designers and new advisers with practical, flexible guidance.
It includes prompts, real-world examples, and tips for involving students at all grade levels.

3. 10 people to thank
Yearbook creation doesn’t happen in a vacuum. This gratitude-focused post highlights the unsung yearbook heroes, including the front office staff, IT teams, principals, coaches, and more. Yearbooks are a high-stress, deadline-driven project; injecting gratitude is a reminder that the yearbook extends beyond your class or club.
Make gratitude part of your yearbook culture:
- Include a recurring “Who Helped You This Week?” check-in during staff meetings.
- In the yearbook, you can include a “Behind the Book” thank-you spread.

4. Adviser advice: keep, change, stop
One of the few tools that seamlessly transferred from student teaching to the newsroom is “Keep, Change, Stop,” a structured reflection tool. It helps teams evaluate the yearbook process with three simple prompts: what to keep, what to change, and what to stop doing. (Clever name, eh?)
It’s an adaptable debrief for editors, staff, and advisers alike.
In this blog post, four yearbook advisers share their POV. Based on their real-life examples, we have a framework to drop what’s not working and preserve beneficial habits each school year.
Doing this exercise with middle and high school yearbook creators encourages student voice and leadership in shaping the next year’s book. “Keep, Change, Stop” promotes a healthy, intentional yearbook culture.

5. Yearbook debriefing: a summer reflection
This five-minute read outlines a strategic, low-stress way to reflect on the yearbook process over the summer. It offers questions and prompts to help advisers and returning staff capture what worked and what needs to shift before the next yearbook creation cycle begins.
This post helps you process what happened while it’s still fresh, and with a little distance.
To use it now, assign editors a summer reflection form based on the post’s questions and use their input to build your back-to-school agenda.
We all want our yearbooks to stand out, and sometimes the best yearbook ideas (wink, wink) are hiding in plain sight. We hope these five blog posts deliver the clarity, creativity, and strategy you and your staff need.

The benefits of joining yearbook committee for students
Yearbook committee is a great activity for students to get involved with, but not all students know the benefits that it can bring them. Plan ahead for next year by planting the seeds in students'heads now about why they should seriously consider joining in on the yearbook fun next year.
Drive home to them that some of the benefits of joining the school’s yearbook committee include:
Getting involved
Not every student is into sports or possesses musical talent. But that doesn’t mean that they can’t get involved with their school. Joining the yearbook committeegets students involvedon all levels – from mingling with students, to attending school events, and actively participating in something that benefits the entire school body. Students benefit from yearbooks just as much as the schools do in creating a positive school spirit. And when kids have school spirit, they perform better as students.
Teaches crucial life skills
Deadlines, deadlines, deadlines. A yearbook staff is never short on deadlines. But even though they sound stressful, deadlines can be very beneficial in helping students learn skills that they will use through school, college, and the rest of their lives. Time management, prioritizing, reliability, and the responsibility of following through on tasks when others are depending on you are just the tip of the iceberg of skills that students learn when working on a yearbook.
Provides writing and journalism experience
Writing copy for yearbooks is a lot harder than it might originally appear. When students are forced to use rules of proper attribution, go through an in-depth interviewing process including follow ups, or are crafting a creative piece, they build upon the fundamentals that they learned in English class. Practice makes perfect and the more you write, the better you get at it.
Provides creative experiences
Photography, Photoshopping, page layouts, yearbook themes, design ideas – putting together a yearbook from start to finish is full of tasks that get the creative juices flowing. It’s very rewarding for students to have the physical proof to show for all of that hard work they put in over the course of the year. When anyone first starts a project, it’s easy to get lost in all of the details. But being able to look back at the end and see your creation is a great feeling that gives students a strong sense of pride.
Great addition to a portfolio
Whether they are trying to get into AP English classes in high school or they’re sending out applications for college, being able to have yearbook committee included in your portfolio gives you that much needed edge. Schools can be a very competitive business and often good grades alone aren’t enough to get into the school that students are hoping for. When a student is able to show that they were an active member of a hard working team, it helps showcase their overall skills in multitasking, socializing, developing ideas from concept to execution, and everything in between. A well-rounded portfolio is very important in whichever direction students choose to move forward in their academic careers.
For students who are looking for a creative outlet, looking to learn the pressures of deadlines, or looking to learn the basics of reporting, your school's yearbook club or committee is the place for them to be. They might need to be recruited, but what they need to know most is how much joining a yearbook committee will benefit them.
Sell them on that, and your yearbook will be better because of it.

No longer the yearbook adviser? Here’s what to do next
What I wish I knew before taking over yearbook
Every new adviser is going to mentally prepare this list. You can take one thing off by setting up the new yearbook adviser with a list of must-know and must-do information.
Why do people stop advising yearbook?
Advisers move to new schools. Administrators cut costs. Teachers retire. Others no longer have an affinity for awesomesauce.
Remind the new adviser to take heart! There are many on this journey to become a project manager-slash-school-historian-slash-marketer-slash-designer.
One sheet to share
Use the list below to create an indispensable guide for your successor. If you’re like me, you may be tempted to create a fully illustrated manual with a month-by-month guide, financial forms, and plenty of Lucid charts. Don’t.
A one-page reference should include the following:
Publisher info This is #1: include all your contacts for your publisher plus how to contact support. If you have a multi-year contract, include it and its expiration date.
School photographer Add the photographer’s name, email, and phone number plus who who is in charge of picture day. (No one wants to find out last minute they are stuck with that gig.)
Financial information Include information on your book price, publisher promotions (heeey 10% off in the fall), ad prices, book sales from previous years, and subscriptions.
Page count We love a good yearbook ladder. Your predecessor will too.
Yearbook traditions There’s a fine line between sacred cows and ordering an archive copy of the library.
Procedures If there is an editing checklist, camera checkout policy, or go-to person for name proofing, include that info.
Passwords Ensure your successor can access social media accounts, generic photo emails, and the yearbook room computers.
“It’s not about me, it’s about us”
Make the transition smooth. No one is going to run your program exactly like you did. That’s an unfair expectation. Instead, offer your ongoing support and mentoring to your successor. By remaining available to answer questions and provide (solicited) guidance during the transition period, you are putting others first. That’s classy

How to take great yearbook photos with an iPhone
Here’s an old adage in photography that your best camera is the one you have with you. For most of us now, that “one you have with you” is your smartphone.
Even though the quality of smartphone photography has increased significantly over the last couple years, the cameras in our iPhone, Android and Windows phones aren’t at the level of those cameras professional photographers use.
But that doesn’t mean we can’t teach you how to take great yearbook photos using your iPhone. You just need to follow a couple basic rules. (For more in-depth yearbook photo guides and ideas, visit our Photography Tips and Tutorials board on Pinterest.)
Hold with two hands
The steadier you are able to keep your phone, the less likelihood for blurry photos or accidentally out-of-focus elements.
Smartphone cameras are getting better at image stabilization, but you don’t want to rely on that technology. Instead, ensure your camera is steady by taking the responsibility into your own hands. Literally.
Several companies are now making tripods for smartphones. If you’re a photo enthusiast, they’re worth the purchase. They’re relatively inexpensive, easy to pack away and work well. If you’re just looking to get a good shot, however, you can do one of two things: find a level, sturdy foundation on which to place your phone or hold your phone using two hands.
Though it may take a few extra moments to place your phone or steady the camera with both hands, either option works far better than aiming with one hand – especially in poor light.
Do not zoom
Smartphone cameras feature a digital zoom – something that’s different from a traditional camera lens. The “digital” means the camera is actually “zooming in” on the photo itself, not the subject that you are shooting.
That “zoom” is really just a crop of the photo, meaning you’ll lose data in the photo and end up with an image that is less clear and less sharp than an image that was taking without zooming.
If you are looking to get a closer shot using a smartphone camera, do you best to get closer. If you can’t do that (say you’re at a soccer game), think about different photos you might be able to take. You could capture the sideline reaction to a good play, a more “artsy” shot of the action from behind the goal and other creative takes on a soccer game.
And, if you’re truly looking for in-uniform action shots, consider using practice, warm-ups or post-game activities as a photo shoot.
Keep shooting
With Apple’s latest change to its iPhone operating system, it updated the camera software to take up to 10 photos per second. Other smartphones offer the same “burst mode” capabilities and they’re great to use in almost any situation.
Whether it is an action shot at the soccer game, the school play or the choir, you’ll never know when a “burst mode” shot will capture something you otherwise might not have.
If using the “burst mode,” lock your focus and exposure. That way, you’ll have a consistent depth of field and exposure.
Use the grid
We’ve already covered several tips for composing great photos. Most smartphone cameras will help you with this effort by providing you a grid.
Turn it on when you’re really focused on composition. The grid will help you align your photo and balance your shot – both of which are especially important when trying new angles and invoking the rule of thirds.
Avoid the flash
The flashes on smartphone cameras often produce harsh results that look far different than the scene you are experiencing.
To avoid this, turn off your flash and see what your results look like. Most smartphone cameras are getting better at shooting in low light. You might need to touch up your photo, but your shots should be generally useable.
If they’re not, and if you need some extra lighting, borrow someone else’s phone.
Instead of using the flash on your phone, use the flashlight on their phone to light the scene. You’ll have better control of the light, create dramatic effects and produce better photos.
Download apps
Instagram’s explosion in popularity has opened up most people’s eyes to the “magic” a filter can provide to photograph.
While Instagram is the undisputed leader in popularity, there are several other filter apps that can create different feels for your photos. We’ve gotten good results from VSCOcam and Camera+. Consider checking out the “contenders” in addition to the champ. (Try to share this yearbook idea with your entire school.)
Whichever you use, make sure you save a version of the photo to your phone.
Have you been using smartphone photos in your yearbook? What has been your secret to great photos?

These yearbook photo tips will have your book looking better in two minutes or less
The easiest way to improve your yearbook photography is to spend two minutes editing your photos before you add them to your book. That’s because, in two minutes, you can make the two biggest improvements to any photo you have: composition and white balance.
It doesn’t matter if you or your staff purposely took the photo for use in the yearbook or if a parent snapped a shot on their phone and only gave it to you once you asked for help filling your book’s pages. If you spend one minute on each of these areas of improvement, you’ll have a yearbook photo that’s way, way better than the one you started with. We guarantee it.
In this blog post, we’ll walk you through why you should spend two minutes using these yearbook photo tips for composition and white balance, what you should think about before you make any changes, and how you can easily make those edits.
Why you should edit using these yearbook photo tips
The normal process for editing yearbook photos can be a total drain on your time. The results are worth it, because, well, let’s face it: not-so-great yearbook photography makes a yearbook seem not so great.
Great photos, on the other hand, can evoke emotion, tell a story, and captivate an audience—all at the same time. And sometimes, a photo needs a bit of editing to get there. Cropping your photos for better composition can eliminate distractions and correcting the color to improve white balance and lighting can help your photos stand out more.
Spend enough hours eking every last ounce of potential out of a photo, though, and you’re bound to wonder whether it’s all worth it.
If that’s you, or if you’re totally pressed for time, you never need to get to that point.
That’s because two of the quickest, easiest editing techniques you can use will get your photo more than 90% of the way to its full potential.
If you want to keep going for that final 10%, go right ahead.
But if you’re pressed for time or stressed about deadlines, crop your photo to improve its composition, use color correction to improve white balance, and move on to your next photo. Because, when you have hundreds of photos you want to add to your yearbook, 90% of full potential is pretty darn good.
What to think about before using our yearbook photo tips
Just using our two yearbook photo tips will give you great photos and save you a bunch of time. But you can always save more.
The trick lies in the old “work smarter, not harder” saying.
Here’s what you need to think about to save yourself even more time and sanity during your photo editing process:
- If your yearbook publishing software lets you crop your photos after you’ve added them to your pages, wait until then to take that step. Doing so will increase your flexibility when it comes to adjusting layouts on the fly.
- Start with an idea of how many photos you need for your book. This sounds daunting, but 1) it’s not, and 2) it’s super helpful to pre-plan and know what you need to make your pages awesome. If you’re using templates or master pages, this is a total breeze.
- Review the photos you have and start making two lists: likely to use, not likely to use. How you make these depends on how you organize your photos, but here’s one way that works for just about every scenario: Rename all “likely to use” photos with “a_” at the beginning of the file name and all “not likely to use” photos with “b_” at the beginning. That way, everything’s clearly labeled and, if you sort by name, your best photos show up first.
- Edit your “likely to use” photos. If you’ve got enough, your work is done. Sweet, right? If you’re still short some yearbook photos, you can go back through and find the best of the “not likely to use” photos or start hassling your school community to send you great photos.
If you’re cropping your photos before adding them to yearbook pages, you’ll also want to keep this in mind: You’ll need a variety of photo constraints and orientations.
Which is a perfect transition to…
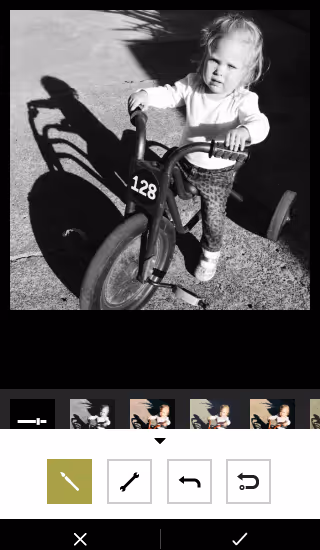
Yearbook photo tip #1: composition
We’ve talked before about the three tips you should keep in mind when composing yearbook photos, but that doesn’t guarantee you’re always going to nail them. Or that people who are giving you pictures will, either.
Sometimes, the only way to save a yearbook photo is to crop it.
Take this before-and-after as an example:


There’s a lot of good stuff going on with the photo on the top: It’s well lit, the students’ faces are clear, and it’s easy to identify where they are.
The problem?
It’s the same one that haunts many yearbook photos: Drop it into a spread or collage and it’s not exactly going to be easy to identify these students. They were too far away from the camera when the photo was taken, and there’s just too much empty space around them.
You can solve that by tightening the composition. Notice how much more the two students fill the frame in the photo on the right?
That’s exactly what we’re going for.
When you’re cropping yearbook photos, keep these two tips in mind:
- Fill the Frame. What matters most in a yearbook photo is capturing the person or people who are the subjects. Make sure to keep the attention on them. As a photographer, the best way to do that is to get very, very close to your subject. If that didn’t happen, though, you can crop out the empty space surrounding your subjects.
- Use the Rule of Thirds. If the “rule of thirds” is a new yearbook term to you, it’s basically a guideline in photography that encourages a photographer to move the primary subject of the photograph away from the center. The easiest way to do this is to use a grid overlay function while cropping, and move your subject to one of the intersecting set of lines.
Of course, we’d be slacking in our advice if we didn’t mention that, no matter what, you should be cropping with a purpose. Or if you want to frame this advice slightly differently: Don’t crop for the sake of cropping. The new constraints for your photo should make your photo better or make your page layout better. If your photos are already great, and they look great in your layout, you can skip cropping.
Yearbook photo tip #2: white balance
Ever feel like your photos don’t really look like the breath-taking scenes you saw with your naked eye? We feel you.
Outside of cropping your photo, the easiest way to restore some of that magic is to make the colors of your yearbook photo more vivid and more lifelike. And you can do that by using the levels tool in your editing software.
To do that, though, you need to know some basics about that tool and histograms, the chart associated with it.
Here’s the crash course version:
A histogram is a graphical representation of your photo’s color distribution. The dark aspects of your photo are plotted on the left of the graph; the light aspects of the photo are plotted on the right. When you’re reading a histogram, you want to look for sharp peaks at either end of the scale. A sharp peak on the left side of the graph indicates underexposure, a peak on the right indicates overexposure.
When you’re looking to tweak the color composition of your photo, it’s those peaks you want to be looking for.
Here’s the quickest — and easiest — way to use a histogram to improve your photo’s color:
- Drag your black slider (located on the left of the histogram) to the right until the chart shows blacks being registered (or the beginning first upward slope).
- Then drag your white slider (located on the right of the histogram) to the left, until the chart shows no more whites being registered (or the end of the last downward slope).
These two steps take about a minute to complete, and the result is awesome. You’ll see an improvement in contrast, richer and deeper colors, and an enhanced lightness that reveals hidden aspects of photos that are obscured by overly bright areas.
Here’s an example:


Notice how the red in the stairs and the fire extinguisher really pops in the one on the bottom? It’s less muted and, since the reds are deeper, it makes the person on the stairs stand out more, as well. We dig this change.
And really, that’s it.
It doesn’t matter who takes the photos. If you can spare two minutes and follow these yearbook photo tips, you can make your photos so much better by improving composition and white balance.