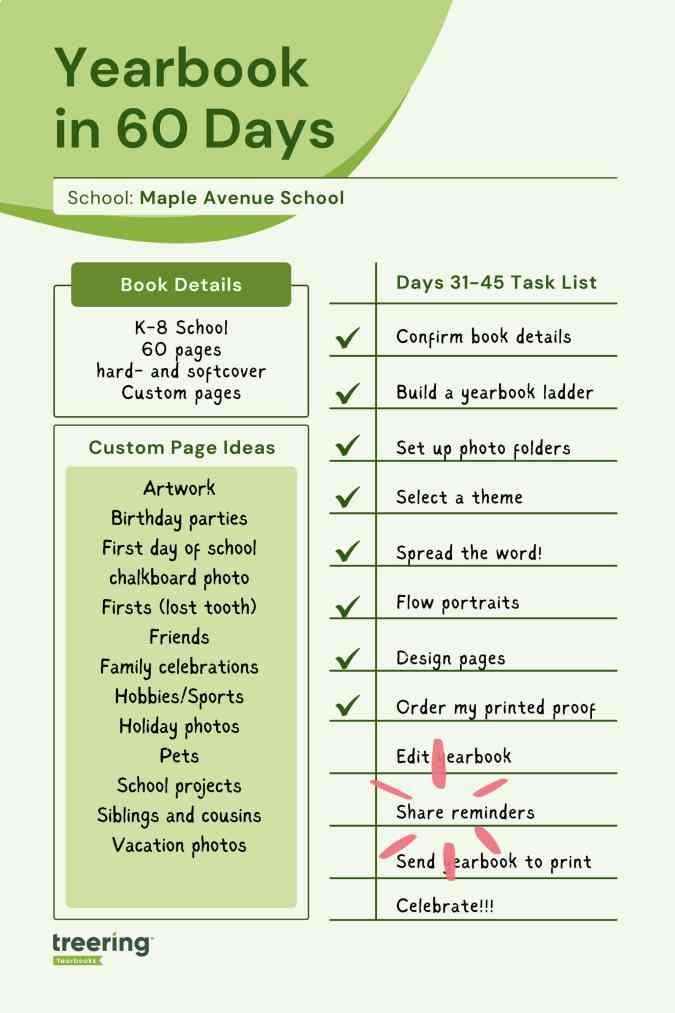
Yearbook in 60 days
Looking for inspiration, design tricks, how to make a great cover, promoting your yearbook and engaging your community?
Most recent

Yearbook in 60 days: part 4 - proofreading and going print ready
This is the final installment in a four-part series on creating a yearbook in 60 days. By now, portraits and spreads are in the book, and it is time to polish both. Day 46-60 tasks center around communication to parents and the print process.

Yearbook (yes, it is a verb) along with us on Facebook, Instagram, and TikTok.
1. Custom page reminders
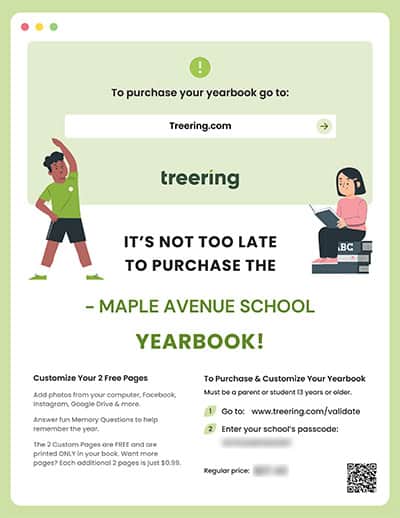
Marketing Rule of Seven aside, parents are busy. Teachers are solving the world’s problems. We need reminders (not the “loving” ones that are really sassy in disguise). Remember the parent purchase date you set during days 1-15? This is the date by which parents should customize and purchase their yearbooks.
While parents do not have to fill their free, two custom pages with memories, a little education goes a long way. Here are a few ideas for reminders:
- Include a flyer in the monthly newsletter
- Share a video tutorial on your parent group’s social media page
- Create a virtual parent event aligned with one of Treering’s parent webinars to “attend” together
- Host a custom pages night and walk parents through the process
Custom page resources
Remember, you must use the login button to access the editor articles.
- Editor Video: Reviewing All Students' Custom Pages
- Parent Video: Creating Custom Pages with Page Builder
- Parent Video: Creating Custom Pages from Scratch with Page Editor
- Spring Parent Webinars: Yearbook Club
2. Make corrections
Continue using those PDF proofs and the page warning tray to manage duplicate images, low-resolution images, margin warnings, and spelling errors.

Page warning tray resource
- Editor video: Page warnings
3. Print ready process
You tell Treering when to begin the printing process. When your Finish Editing Yearbook Deadline arrives, your yearbook does not automatically head to the printers. Remember, your three-week turnaround begins from the date you send the book to print.
It will take 15-20 minutes for you to complete the pre-print process below.
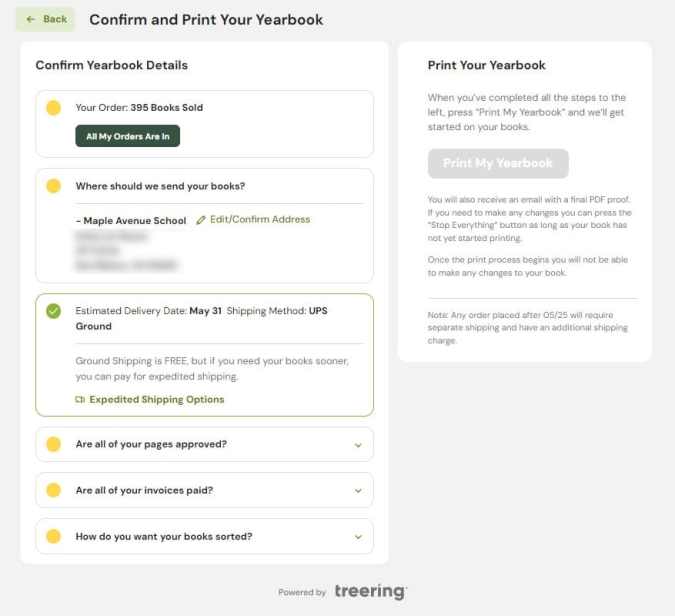
After you complete the checklist and select the dancing “Print my Yearbook” button (cue the confetti), you will receive an email with your final-final PDF proof and instructions if you find a grievous error and need to stop the printing process. There is an extremely short, blink-and-it's-over window to do this; it may cause production delays.
Sending your yearbook to print resource
4. Never say, “no.”
You will never have to turn away a student at a Treering school who wants a yearbook after the print deadline. With Treering, you can even order and personalize past years’ books.

Additionally, with the fundraiser and book donation options, you can ensure students in need have books as well.
Post-print ready resources
- Parent video: Buying a yearbook for a previous school year
- Article: After deadline orders
- Video: Fundraising disbursement options when setting your yearbook to print ready
- Case study: Yearbook hero Janet Yieh gives away yearbooks
Feeling adventurous? Plan a party!
Yearbook signing parties need not be extravagant: tables, pens, tunes.
Yearbook Signing Party Resources
You did it! How will you celebrate building a yearbook in 60 days? Be sure to tag @treering on Facebook and @treeringcorp on TikTok and Instagram to show us. Happy yearbooking!

Yearbook in 60 days - part 3: yearbook design
Two blogs ago, we began our journey to start and finish a yearbook in 60 days. From establishing a ladder and crowdsourcing structure to flowing portraits and adding in fall events, the first month yielded a near-complete yearbook. These next fifteen days of our adventure include proofing, promoting, and packing in spring events. All the resources you need are linked below (for help center articles, you will need to log in to the editor help center).
Yearbook (yes, it is a verb) along with us on Facebook, Instagram, and TikTok.
1. PDF proofing
Just because we are speeding through the yearbook creation process doesn’t mean we will be careless. Proofing tools such as downloadable PDFs and a free, physical cover-to-cover proof of your yearbook are free through Treering.

Let’s start with PDFs. English teachers everywhere will tell you errors that are missed on the screen often pop on paper. Read any copy (stories and captions) aloud to assess for tone and errors that digital proofing tools missed. These are low-resolution (the actual print file size might crash your computer), so you can download them quickly.
Use your PDF proofs to also
- Triple-check your portrait pages: correct spelling of names, the accurate placement of students and teachers in classes or grades
- Ensure faces aren’t lost on the edges (margins) or in the middle (gutter) of your spread
- Students are visible in the photos: sometimes, a photo box is the wrong size, and the faces are either huge or unrecognizably small. When possible, try to make all faces on a collage spread the same size.
- Show sneak peeks to your buyers - when parents see their child is in the book, they will buy the book!
Pro tip: use as many of your 99 PDF proofs as possible!
Yearbook editing resources
2. Design pages (spring/second semester events)
Last time, you learned two ways to design. Because the second semester is unfolding as you build your yearbook, it may be easier to collect photos. This is the time to evaluate those first semester spreads: if they are not full by now, combine events and re-allocate space.
Coverage resources
- Blog: Six Ideas to Fill Pages in Your Yearbook
- Article: Adding Pre-Designed Pages (You must login to the editor Help Center to view)
3. Purchase reminders
In these remaining 30 days, up your promotion game by doing at least one thing a week to share about the yearbook:
- Reach out after each school event with the appropriate photo share link and email
- Call or email parents of students who are in the book three times and have not purchased
- Have a contest: the grade or homeroom with the largest percentage of purchases earns extended recess
- Remind purchasers to customize their yearbooks (more on this next time)
- Ask campus influencers (ASB, PTA/PTO accounts, athletics) to hype the yearbook
- Have flyers at a school-wide event, such as the band showcase
Yearbook sales resources
- Google Slides: Customizable Flyers
- Article: Tools for Promoting Your Yearbook
- Blog: 5 Social Media Posts to Sell Yearbooks
4. Printed proof
Treering’s Marketing Manager Megan P. likes to say, “Works in progress welcome!” Because you need your printed proof in hand before your final deadline, order it now. It can take up to 18 business days for this yearbook freebie to arrive.
With portraits and fall events in the book, there is plenty to evaluate. Use your remaining PDFs for copy and photo edits.

Pro tip: When my printed proof arrives, I take a Sharpie and mark it up. Then, I use it as a tool to clean up each spread one by one.
Proofing resources
Yearbook with a friend
Involve a second or third set of eyes during the proofing process. Potential yearbook proofing heroes include:
- Front office staff (they know all the things)
- Student TAs
- The secretary of the parent group
- Coaches and club leaders
- A friend who owes you a solid
Next time, we’ll send the yearbook to print and prepare for distribution.

Yearbook in 60 days - part 2: get the word out
This blog is part two of a four-part series on creating a yearbook in 60 days. Each part contains two weeks' worth of tasks and inspiration, and this time, it’s all about promoting and designing the yearbook.
There are links to articles, videos, and additional blogs throughout. Treering editors, you'll need to log in to your dedicated help center to view some.

Yearbook (yes, it is a verb) along with us on Facebook, Instagram, and TikTok.
1. Share the good news
You’re building a yearbook, which is a mic-drop task in itself. People need to know how awesome (you are) the yearbook will be. Treering created flyers, QR codes, and personalized links for you to quickly share.

Yearbook marketing 101
“Buy your yearbook” is not your only message.
Yes, you are selling the yearbook. You are also rallying stakeholders (administrators, teachers, plus students and their families) to support the yearbook project by purchasing, sharing photos, donating books, and joining the yearbook staff next year. So, go get them!
Identify the best to reach each stakeholder where they live. In other words, go to them. Utilize all the communication channels available to you and evaluate which ones work best for each group.
Possible channels include:
- Staff newsletters
- Morning announcements
- All-call services
- Parent organization website
- In-school bulletin boards
- All-school events
- School meetings
- School sports games
- School arts events
- Social media
Yearbook marketing resources
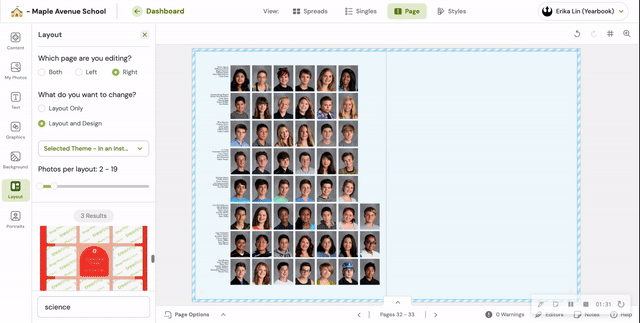
2. Autoflow portraits
Ready to level up your yearbook achievement? Portraits comprise 40-60% of a yearbook. Between the choice of a Heritage Cover and building portrait pages, you’ll be halfway finished. Take a minute to let that soak in.
If a professional photographer took your school photos, chances are you have a PSPA (Professional School Photographers' Association) file. This is industry standard. With it, you'll be able to go to the portrait tab and follow the prompts. (If you don’t have a PSPA file, you can still use autoflow. See the resource section below for instructions.)
Portrait resources
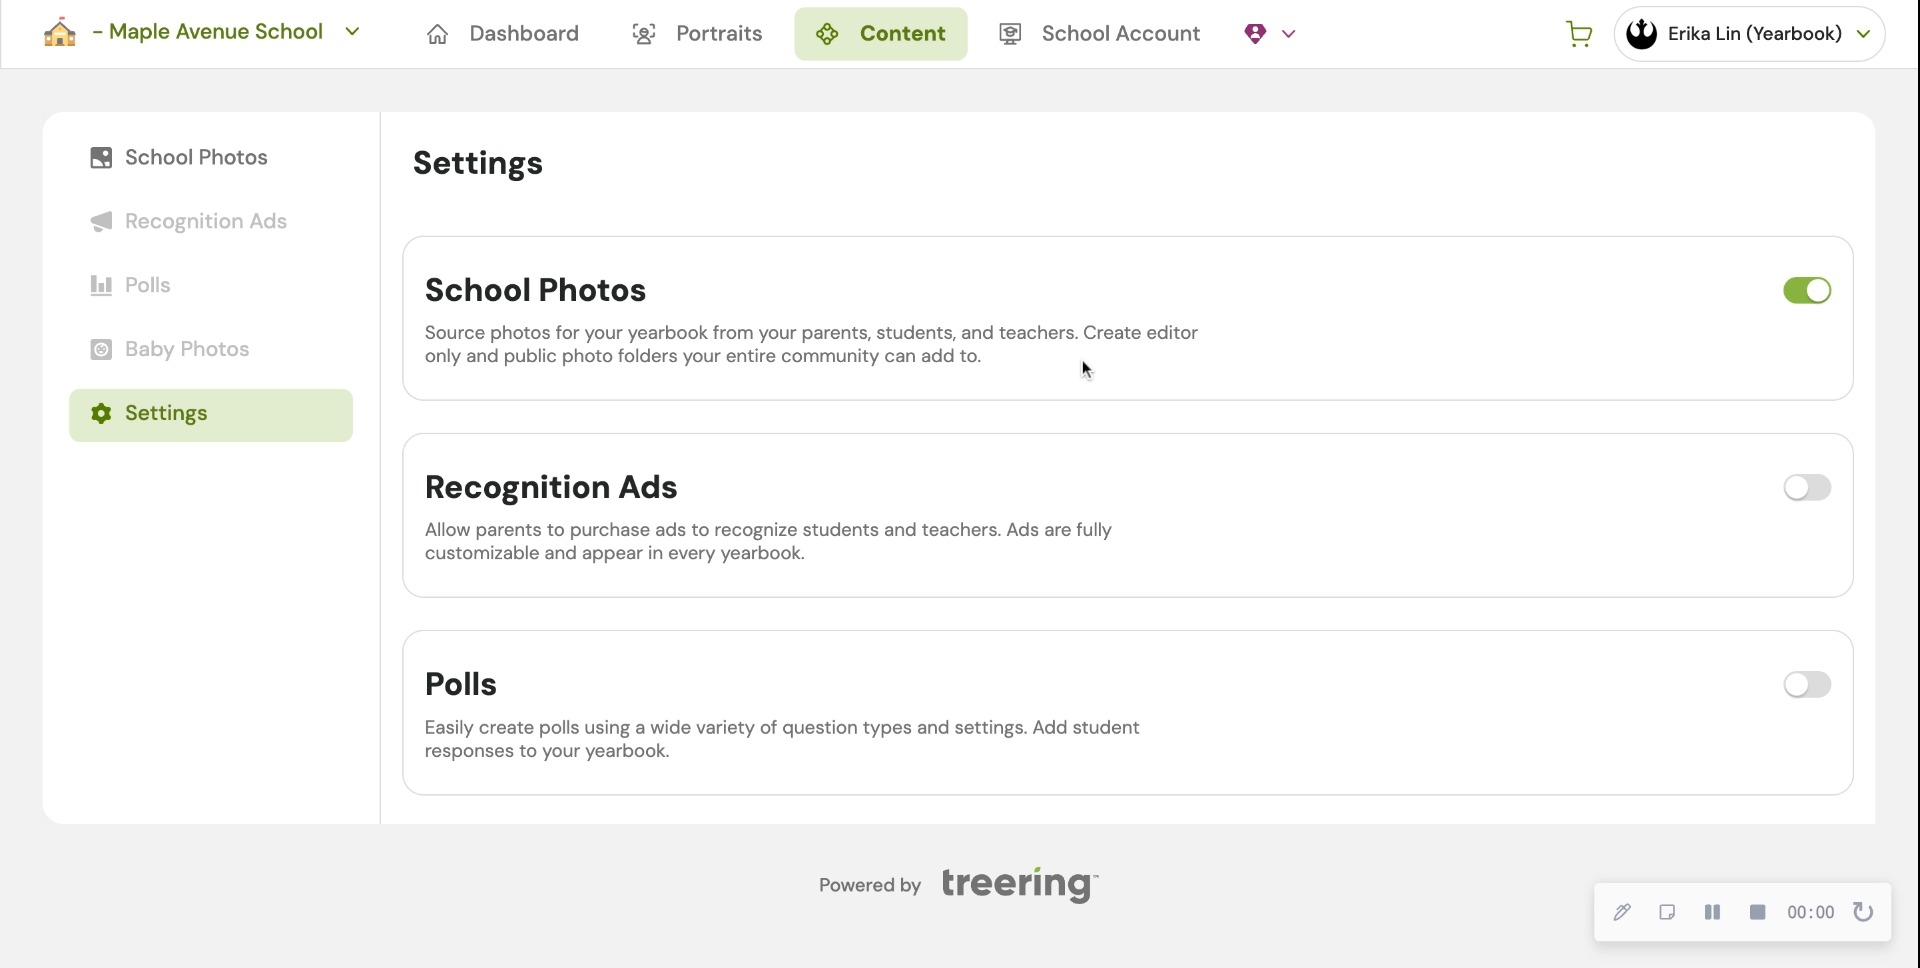
3. Fill your photo folders
Remember when we set up the photo folders, and some were green? That means only the editorial team (you!) can see them and their contents. The yellow public folders are marked public, and your school community can share photos by
Treering’s privacy measures prevent just anyone from uploading to your shared folders. Only your invited school community members with activated yearbook accounts can see and share.
Parents and editors can add photos from their computer or mobile device as well as third-party connections to your personal Facebook, Instagram, Dropbox, Google Photos, and Google Drive.
5 Ideas to source yearbook photos
If you build it, will they come?
- Send each teacher a link to their class folder; ask them to share it with their room parents
- Share event-specific (hello, last Friday’s zoo trip) asks via social media
- Show coaches and club leaders how to add photos via their phones
- Connect with event organizers so they know you have dedicated space and you need pics
- Comment, “Will you share this for the yearbook [email/link]?” on Facebook photos you want to include
Crowdsourcing resources
- Article: Email Photos Directly Into A Photo Folder
- Article: Sharing Photo Folders with the School Community
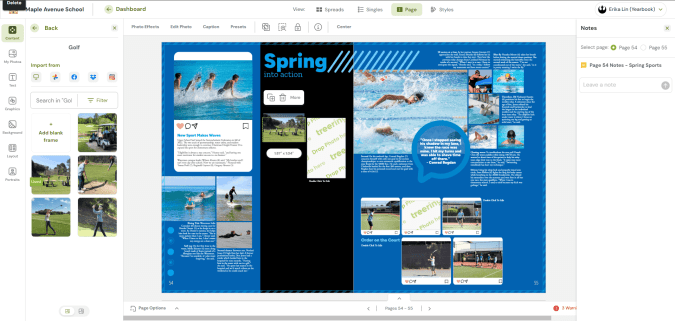
4. Build your spreads (First semester events)
As your photos fill your folders, drag them onto your spreads. There are two ways to quickly complete pages using Treering’s built-in tools: auto page layout and templates.

Everything is fully editable, so if you need to add or remove a photo, text box, or piece of theme art, permit yourself to do it!
Yearbook design resources
- Article: Changing the Background on a Page (remember to login to view)
- Article: Page Editing Options - Graphics
- Article: Page Editing Options - Layout and Design
Feeling adventurous?
Create your own layouts using Treering’s drag-and-drop design tools.
Intermediate and advanced design resources
- Examples: Winners of the 2024 Design Contest
- Blog: What is Modular Yearbook Design?
- Article: Setting Default Text Styles
- Article: Setting Default Photo Styles
- Article: Alignment Tool - Customizable Guideline Grid
- Templates: InDesign
Halfway through building a yearbook in 60 days, you should split tasks between gathering photos and adding them to the book. The cover is finished. Portraits are flowed. First semester events are filling in. Congrats!

Yearbook in 60 days - part 1: yearbook quickstart
Two types of people start a yearbook towards the end of the school year: those handed the crown minutes ago, and those with hundreds of other tasks for the school and now have “free” time to begin one more. Creating a yearbook in 60 days is doable. Promise. We’re breaking it down for you in four parts, each with two weeks' worth of tasks and inspiration. Consider this your yearbook easy button.
Throughout the series, there will be resources for inspiration and help.
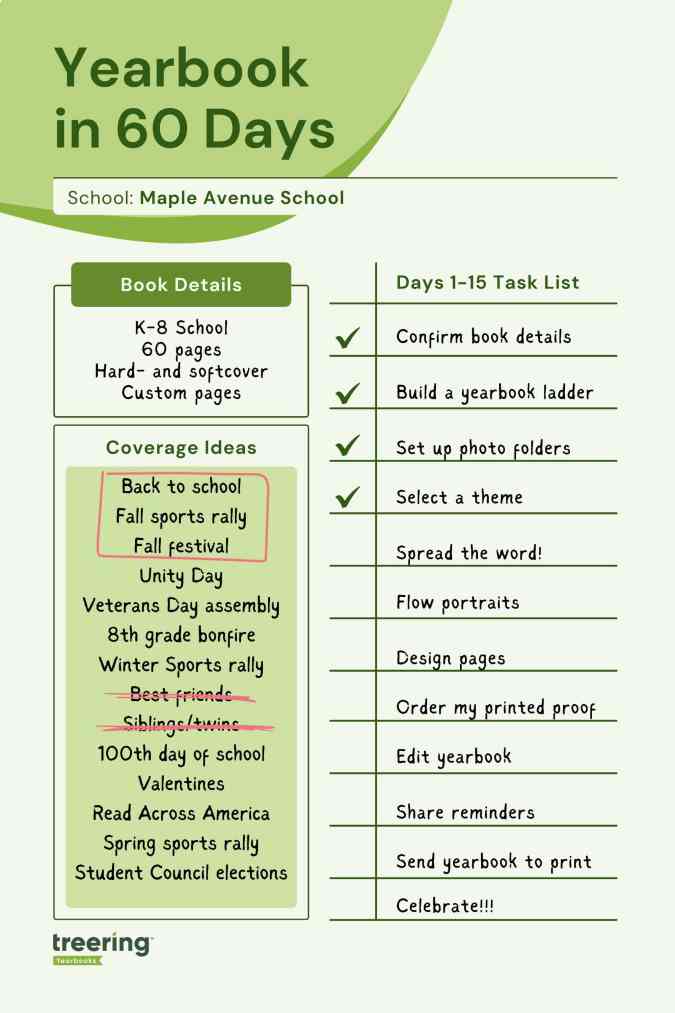
1. Confirm your book details
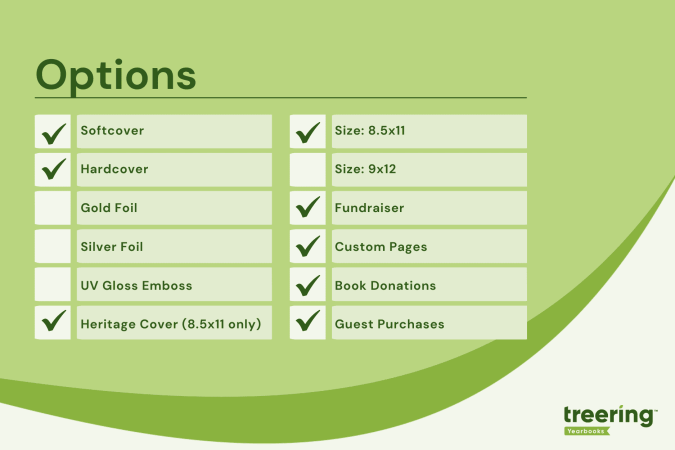
It’s tempting to jump into the glamorous yearbook tasks such as theme and design. There’s a little back-end work you need to do first for two reasons:
- Your dates will direct your workflow
- Your yearbook details determine the price of your yearbook
Dates
With Treering, you can change your dates at any time. Remember, your three-week turnaround begins once you hit Print Ready, and send your book to the printers.
For parents: custom pages deadline
Parents will see this date on their account, indicating when they should purchase the book or complete any customized pages. It doesn't impact the printing schedule.
Some parents {raises hand} need a little extra time and reminders to complete theirs. Treering recommends a cushion of about two weeks.
For editors: finish editing yearbook deadline and estimated delivery date
This is your one and only deadline for editing the book—and you set it! Select a date three weeks from when you want to distribute it.
You won’t be able to edit the delivery date directly. Treering automatically populates it by the date you choose for your deadline. If you need additional time to capture year-end events, no problem. Your three-week turnaround will align with your new deadline.
In part four, you’ll learn how to send your yearbook to print.
Pricing
The yearbook price will change in real time when you adjust the page count and cover finish. The best way to firm up your page count is to create a ladder (more on this below).
Shipping and index
Bulk shipping to the school is free. If you select this option, you choose how to receive your yearbooks:
- Sorted alphabetically
- Sorted by grade and then alphabetically
- Sorted by teacher and then alphabetically
Alternatively, many online or hybrid academies and schools electing to do a fall delivery choose the ship-to-home option. When parents order yearbooks, they also pay a flat rate shipping fee.
Book details resources
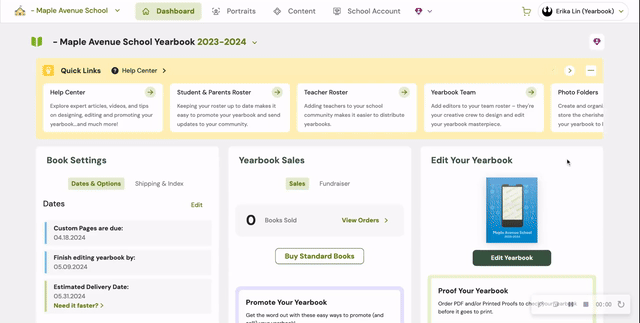
- Video: Chief editor dashboard
- Free Live Webinars: Treering’s Yearbook Club
2. Build a ladder
A ladder is a chart that represents the pages in a yearbook. It’s the industry-standard tool to help you stay organized. On it, you allocate a topic to each yearbook spread (that’s yearbook-ese for two facing pages).
Because yearbooks tell the story of the year, there isn’t a codified order to how things go. Typically, they include
- Academics: school distinctives, achievements, and activities
- Events: fundraisers, activities, performances, before- and after-school activities
- Organizations: clubs and teams
- People: student, staff, and faculty portraits
- Thematic content: larger books employ divider pages to separate sections
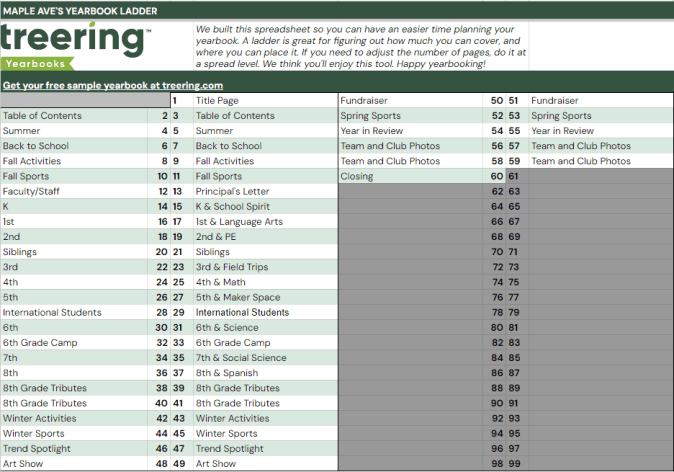
To build your ladder, look at the last few yearbooks and the latest school calendar.
- Brainstorm the non-negotiable events, sections (people, arts, sports), and yearbook traditions
- Brainstorm features, specials, and theme-related content
- Decide how you will organize the book
- Allocate spreads
We love doing this digitally because it can be fluid. If your page count is looking overwhelming because of time or budget, combine some topics. Remember to update your page count on your book details so it matches your plan.
Yearbook ladder resources
- Google Sheet: Yearbook ladder template
- Google Sheet: Example ladders (there’s a separate tab for elementary, middle, K-8, and high school examples)
3. Set up photo folders
The best photo organization tip I can give came from Yearbook Hero Katie Parish. She said to create folders to mirror your ladder. This way, you know you are collecting content for every single spread you planned. And spoiler alert, your design process will look like this.

By investing the time to set up folders this way, you can simplify your workflow. Just open the corresponding folder and click, drag, drop, and done!
In the video below, you’ll see how to add folders and set up crowdsourcing features. Notice the Art Show folder is Editor Only. This means only you, the editor, can place photos in this folder. After activating their accounts, parents will see the yellow “public” folders and be able to share. At any time, you can make a folder Editor Only and vice versa.
In Part Two, we will give you five strategies to fill those shared folders with content so you can build your pages.
4. Choose a whole-book look
The Styles menu is where it’s at: you can create font and photo presets, adjust your margins (#TeamMarginsOff), and select the theme for your yearbook. Because I have 60 days to create a yearbook, I am skipping all the customization options and selecting a pre-designed theme to give my yearbook a unified look.
For a cover-to-cover drag-and-drop experience, the design team recommends the following Treering themes:


Theme resources
- Google Slides: All Treering’s yearbook theme kits
- Blog Category: Theme ideas and inspiration
Remember, get to know your dashboard; it’s the first thing you see each time you log in. Part two of this series will outline the promotion tools built in the yearbook builder and start the design process.
Yearbook with a friend
You can also recruit team members to help you build and market the yearbook. With Treering, you can set permissions and assign pages to help delegate your workload. Additionally, parents, teachers, and students can help gather content and promote book sales.